Friday, March 26, 2010
Barred Rock Chickens and my New Incubator
Here's Alaska, still feeling like she runs the place but in fact keeping a measured distance from actual proceedings.
Here are the barred rock chicks I hatched in my home made incubator recently. They may be oblivious to the fact, but I think these are the guys who actually run the place!
And they're getting pretty friendly, more than happy to approach me when I go out back to see them.
Since I've just auctioned my incubator on trademe, I decided to get this new incubator for my next hatch. She's the one in the foreground, a pekin chick. My plan is destined to fail if this wee chick is a boy...come on wee thing, future generations are relying on you!
It looks like there are only two, but in fact there are three barred rock chicks behind the pekin bantam. These were bought in order to make sure I wasn't left with only one female from my previous hatch. I don't want one lonely barred rock hen. I'm having trouble sexing my barred rock chicks, so I have these to make sure. Plus I traveled during my chicks' early childhood and missed out, so it's good to have a second go at raising them with the leftover medicated feed I bought.
And finally here's Alaska paying me a visit while I'm mothering my chicks. She's acting uninterested here so that she can gain my trust and get a minute alone with the chicks. No, actually she's very good around chickens. I'm glad New Zealand doesn't have the predators they have over in the US. I find my chickens can usually fend off even the meanest looking kitties. I doubt they'd have the same success against a fox or some such.
Thanks for reading my post, now you're up to date on my back yard.
Come again :)
Sexing Barred Rock Chicks
I've been going through a phase of believing that I have three boys and only one girl. This is largely based on the fact that one of my chicks looks distinctly different from the rest.
Look at the colour of the chick on the right, "she" is much darker than the other three which look like her friend in the picture there. No, she's not just sitting in a shadow there :) Also, she acts more feminine in my opinion. She's a bit shy, she's a bit more attractive and not as lanky as her boy friends.
So I've read posts on other websites that say you can tell a Barred Rock hen's sex even from their first week based on some distinctive markings. The females have a smaller more distinct yellow dot on their head, and darker trouser fronts. The males have a more smudged dot, with grey trouser fronts. Well looking at my photos I see a lot of smudgy dots which supports our theory that they are mainly boys.
BUT! Since they're a bit older now, there are other indicators starting to appear. One of our chicks is developing a distinctive boy's tail! Once he gets some plumage back there it will be fairly obvious which sex he hails from. Using this marker leads me to believe we have one male and three females, which is what I would have liked to believe from the start and would dearly like to be true!
So I shall wait and see what other signs develop before I draw my final conclusions... wish me luck!
Please leave a comment if you have some information about figuring this thing out that might help me.
Friday, February 12, 2010
How To Make Your Own Incubator
You will need:
- A chilli bin/polystyrenebox with lid/wooden box with lid if you can't find the other two. I used a polystyrene box from a catering company delivery.
- A thermostat. I found one at Musgroves for $5. It's an old hot water cylinder thermostat and works just fine.
- A thermometer and maybe even a hygrometer (measures humidity).
- A light bulb and socket.
- An old computer fan. I used a CPU fan for mine. (Optional)
- An unused phone charger which will power the computer fan.
- A piece of glass so you can look through and see the temperature and the eggs as they hatch.
Cut a hole in the lid of your polystyrene box for the piece of glass to sit in. I found a craft knife did the trick for cutting through polystyrene, but if you have proper polystyrene cutting wire use that. Cut the hole a couple of centimeters smaller than the piece of glass so you can make a ledge for the glass to sit on. This is better than having the glass stick out the top of the lid.
STEP 2:
Place the glass in the groove you cut for it and duct tape it securely in place. Duct tape will help to keep the heat in, as the glass will probably be the area of greatest heat loss in your whole incubator.
STEP 3:
Now we have our incubator ready, we need to add the two most important parts - the lightbulb and the thermostat. The lightbulb is going to generate the heat that the embryos need to grow, and the thermostat is going to regulate the heat. You'll read that a hot water cylinder thermostat is not accurate enough for this task, but this was not my experience. Once the system settles you will find that you are seldom adjusting the thermostat and the temperature is staying either constant or near constant. We went for quite long periods without any adjustment. Even the bought incubators recommend checking the temperature four times a day, so this seems comparable to that. You can allow your incubator to settle by turning it on and monitoring it for three or four days before you begin incubation.
Attach your thermostat switch to your light socket. If you turn the thermostat to the lowest temperature you will be able to test whether it is working. Heat it with direct light from the lightbulb and see if it turns itself off and on. Once you have wired this correctly, Make some holes in the side of you incubator box to plug both the lightbulb and the thermostat through. Ideally you would want the thermostat closer to where the eggs are going to be and the lightbulb further from the eggs. This is because you want the thermostat to respond to the ambient temperature rather than the heat radiated from the lightbulb. It is not crucial, as you will see from my picture where I did not follow this advice but was still able to successfully hatch eggs. I would have followed this advice if my length of wire permitted it.
STEP 4:
Skip this step if you are going to make a still air incubator rather than a forced air incubator. If you have a computer fan available I recommend using it. I would have more confidence in an incubator with a fan circulating the air, especially if I was putting a lot of eggs in it. A fan will provide a more consistent temperature throughout the incubator.
Make a small hole in the side of the incubator near the lightbulb. Heat rises so the fan should be closer to the top of the incubator to push the hot air downwards. Push the wires through this hole so the fan is suspended on the inside of the incubator. Cut the phone charger plug off the end of the wire and attach the red and black wires from the computer fan to the two wires you find in the phone charger. They only work one way, but it shouldn't take too long to work out which as there are only two possible ways to connect them! The reason for the separate power supply for the lightbulb and the computer fan is that computer fans run at 5 volts and lightbulbs run at 240 volts. So the mains would blow the fan out of the water.
STEP 5:
The next step is to place the area where you will put your eggs into the incubator. Place your thermometer (temperature) and hygrometer (humidity) in the incubator in the opposite end to the lightbulb. These should be lower than the eggs to stay out of their way when they are hatching, but close enough so that they are reading the actual temperature of the eggs. Also place a small container beside these so you can regulate humidity. On top of the hygrometer place a cut to size piece of chicken wire. This must completely cover the whole incubator so that the chicks can't hurt themselves by touching the lightbulb or any sharp edges. It will also assist you in cleaning if you don't allow your chicks to touch any of the other objects in your incubator.
STEP 6:
Stand back and admire your handiwork! That is a complete home made incubator which you will be able to introduce some lucky chicks to the world through.
I hope you have as much success with the incubator that you have just built as I had with mine. If you have any questions about attaching the thermostat or computer fan feel free to leave a comment. I'll get back to you as soon as I can.
Sunday, February 7, 2010
Chicks with Slippers
Apparently curled feet can be caused by a genetic disposition, or conditions in the hatching environment. When the chick hatches its feet are curled up, and sometimes it doesn't manage to open it properly. The solution I found was to make slippers for my chicks. This isn't really my cup of tea, but fortunately my wife is gifted with an obsession for crafts, so this kinda thing is right up her alley!
Here are some pictures of the magic she worked on one wee chick. Firstly, you need to straighten the toes of the affected foot and place them on a small piece of cardboard.
The idea is to make a slipper that will work as a splint to keep the foot straight while the bones are still soft and developing, so that they develop good and straight. The next step is to make sure the foot is going to stay attached to the splint-slipper. To do this we used little pieces of plaster, so they wouldn't damage the chick's foot when we pull it off (not too sticky).
One other consideration for your chick's slippers - try and make them as boring looking as possible. The last thing she needs is the attention of her siblings who only know how to do one thing - they'll peck at her feet every time they come in sight!
Have you made slippers for your chicks before? I'd love to hear from you. Leave a comment below and a link to a picture if you have one.
Saturday, February 6, 2010
Hatching Chickens - Success!
Since then, two more have hatched. The last three eggs haven't been showing any signs of life while all the drama has been unfolding around them, but one of them has just gotten its first crack. So hopefully soon they'll catch up.
Here is a picture of the chicks still in the incubator which has been holding temperature nicely.

They seem to generally like to huddle together under the light bulb which indicates it's not warm enough in there, but they're not emitting those piercing chirps that they do when they're far away from the light, so I guess they're about right. They're also occasionally pecking at the bits of mash on the floor, and some of them are heading over to the water for a drink. They actually don't change the way they drink their whole lives, because they act exactly like the bigger versions when they're drinking! Lean forward, get some water in their beak, lean back with mouth open and glug glug glug...
Here is a video. Although it was created for my nephew Caleb you might enjoy the sound of the chicks chirping!
Friday, January 29, 2010
Building a Chicken Coop - Part 1
Hatching eggs has lead me to a tricky situation. While I don't want to count my chickens before they hatch, I do want to be prepared for chicks if they do arrive. Like many other things, chicken coops sell for too much on trademe in my opinion. So I've decided to start building a chicken coop. Maybe if I get around to it I might be able to build a few extra to sell and lower the average price of coops on trademe.
So this is part one of my chicken coop building antics.
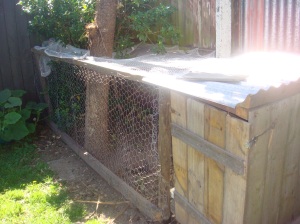
Here is my current chicken coop and run which houses my shaver hens.
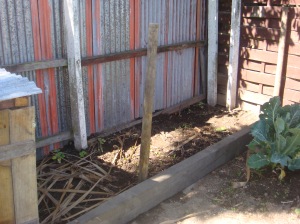
Here is the area where I will make my second chicken run, you can see I've begun work by laying down a large beam of pine and a couple of round uprights. I'll attach some netting to the front of this and perhaps a door on the left so I can get in to clean and add water.
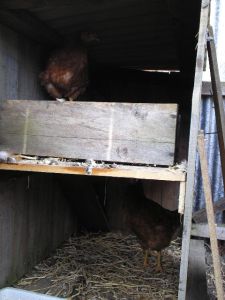
I plan to modify my existing coop which is big enough to house more than the current two chickens. In order to keep the chickens apart rather than disrupting the pecking order, I'll probably make it two story, and give the new arrivals the bottom floor. I made the mistake of allowing my first chickens to sleep where they lay, so they'll probably do that for the rest of their lives. I won't make the same mistake with the new chickens, who will have ample perching space.
Good luck if you're building a coop. The good thing about chickens is they're not at all fussy, you can house them just about anywhere. Buying an expensive coop may make you feel better, but they won't thank you for it!
I'll post part two shortly which will hopefully include pictures of the finished coop and run, modified for its future occupants. Hopefully you're inspired to build your own chicken coop now, rather than paying all your hard earned pennies to someone on trademe!
Incubating Chicken Eggs
My eggs are at day 13 now. I’ve been candling them most nights since about day 5 to check their progress. When you candle the egg at day 13, you pretty much just see a big black portion of egg and an air sack. The reward comes when you see the big black part move, it’s amazing! And to think that this came from a normal egg, in just 13 days under the heat – wow.
Tips for incubating eggs
- Keep the temperature even, but don’t worry too much about slight deviations as long as they’re both up and down. The eggs will hatch at the right time as long as the average temperature was around 37.5C (99.5F) and the extremes didn’t kill the embryo. Mine got to 39.8C at one point, but have still shown normal development. For the most part I haven’t let them drop below 36C or rise above 39C
- Candle regularly. Candling is when you get to see what is actually going on, it’s like an x-ray of the egg, or equivalent to an ultra sound of a baby but using light instead. To candle you need to be in a dark room. Shine a light through the egg and you will see what is going on inside. At day 3 or 4 you’ll see some veins, at day 5 or 6 you’ll see the chick’s eye – a little black spot in the egg. At day 13 I’m starting to see a growing black shadow across the egg that moves sometimes. You can candle as many times as you like without hurting the chick development, as long as you’re gentle and don’t let the temperature drop too low. I use a desk lamp with a small box over it. The box has a small hole where I put the egg.
- Turn the eggs two or three times a day. The embryo can get stuck to the shell if it’s not turned regularly. Apparently the hen will turn the egg around 99 times per day in the process of sitting on her clutch of eggs. Two times is a minimum for incubator eggs, and three times is recommended as this means they’ll be on a different side each night. Stop turning on the 18th day, as the chicken is getting into position for hatching and you don’t want to confuse the wee fella.
- Keep notes. I keep notes of the temperature and humidity at each time I check, turn, candle or raise the humidity of my incubator. I want to know the differences between two hatches if I ever do this again. I want to know what I did right and what I did wrong. These notes will be very valuable at that point, so keep a pen and paper near your incubator to record what’s happening.
- Check temperature regularly. I haven’t adjusted my thermostat for the last three days, but before that I was tweaking it often to try and get the right temperature at all times. I read on a commercial incubator (a hovabator) that you would need to check it at least three to four times a day. This is pretty labour intensive given that incubation period is 21 days. But it’s so important as you don’t want to cook your chicks.
Worm Farming
If you want to know how to keep worms then you’ve come to the right place. I’ve had worms for about three months now and I’m ready to start sharing them with others. I put them on trademe to thin out my population a bit and help someone else get started. Worms are another trademe item that sells for too much, in my opinion. I aee most auctions for tiger worms (aka red worms) starting at $23 or even $27 for 500 grams. Worms double their population every 6 weeks in the right conditions, and they don’t exactly eat caviar (unless that’s what you’re throwing into the compost bin after dinner!). They can be free to setup and will populate quickly. In other words, they should be nearly free to obtain by anyone.
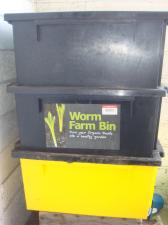
My worm farm has three bins: 1 for catching worm tea, and two to rotate the worms and collect the compost
What worms like to eat:
- Fresh vegetable scraps
- Fruit peels (except citrus)
- Small amounts of hair
- Coffee grinds and teabags
- Avocado skins
- Manure
- Egg shells
- Tissue paper
- Leaves
What worms don’t like to eat:
- Citrus
- Onion peel
- Meat (you’ll attract pests)
- Dairy products
- Lawn clippings in large quantities
- Spicy food
Some common problems:
- Worms are all going to the bottom of the pile:
- Not dark enough, add carpet or newspaper on top
- Lots of little white worms or flies:
- Too acidic, add lime or newspaper or eggshells
- Worms are trying to climb out the top of their housing:
- Too wet, add strips of torn newspaper to soak up excess water
- Worms are looking bloated or pale:
- Too wet, add strips of torn newspaper to soak up excess water
- The worm farm smells bad:
- Too much food, food is decomposing rather than being eaten
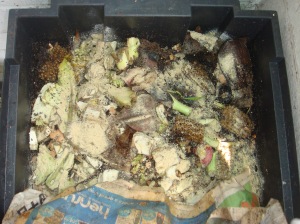
I've overfed my worm farm causing some food to rot so I need to add lime to get rid of the white worms and fruit flies.
Once the worms have gotten established they are going to increase in population according to the size of their home and food supply. Over time they will be able to consume more and more food scraps daily, and will be producing more and more of the good stuff for your garden. The two products you will be interested in are vermicast or castings, which is the stuff that the worms leave behind after they eat your scraps, and worm tea, which is the liquid which the worms deposit and will fill the container beneath your worm farm. Both of these are very rich fertilisers which will accelerate the growth of your plants.
Harvesting the Compost
Harvesting the worm castings involves migrating the worms to another area so that you can remove the compost without destroying your worm population. If you’ve bought a worm farm then it probably has more than one layer. This is so you can migrate your worms to the upper layer to harvest the lower.
To migrate the worms, simply put some bedding and food in the top layer and remove any carpet or newspaper at the top of the bottom layer so that worms can climb through. Once they have eaten all the food supply in the bottom layer they will climb up to the food source and you can remove the bottom layer with all the good compost in it. If it has some worms in it this is not a problem as they can go in the garden and still benefit you (or to the chickens!). Most of the worms will have moved up. If you don’t have an extra layer, you can also migrate your worms sideways to the left or right and harvest the compost on the other side of your container. This is how I manage my large worm farm.
Some worm farms have a tap at the bottom so you can just pour the worm tea into a container and apply it at a ratio of one part worm tea to ten parts water (1:10) and apply to your tomatoes or most prized plants. It’s best to do this straight away as there are lots of good bacteria in there which will die quickly.
Composting Basics
I was given a book about composting for Christmas by my brother. After reading all of about two pages I was hooked, and this is the first time I’ve been hooked on something that is telling me how wrong I have been my whole life!
Here is a quick list of things to do to make great compost:
- Add lots of leaves to your compost pile – more leaves than anything else
- Don’t add any large branches or sticks to your compost pile
- Turn your compost pile over with a fork once a fortnight or month
If you just want to make great compost for your garden, follow these three tips. If you want to know more then read on.
Benefits of Composting
According to my book, composting well helps to control weeds, prevent plant disease, improve soil structure and improve crops. Three of those I can believe, but how does composting help to control weeds? Well I tried a load of compost from a local outlet here in Christchurch, and I’ve got to say it works. Plus I found the experience of buying dirt quite satisfying considering!
My garden has less weeds with it’s layer of compost for a few reasons.
- The compost has fewer weed seeds than the soil I put it on.
- The compost covers the weed seeds below preventing them from ever surfacing.
- Those that do surface are easier to pull out because of the improved soil structure. Even the longer rooted weeds come loose easily.
So that proves it for me – compost helps prevent weeds and decreases my weeding time.
NOTE: Probably the most instinctive way to deal with weeds is to turn the whole bed over with a tiller, rotary hoe, or fork. This is a bad idea. Try applying your compost to the top and when weeds appear pull them out without disturbing the soil too much. This way eventually all the seeds capable of germinating will be removed and you won’t be constantly turning up more seeds to the top. This is a tip from permaculture and the no-dig gardening method.
Why Leaves make good Compost
Leaves are the missing ingredient in most of the compost bins I know about. Basically everyone throws their grass clippings in the compost, and everyone throws their household rubbish in there. But composting requires a ratio of Carbon to Nitrogen, and these ingredients are all Nitrogen rich. This results in a rotting pile of rubbish rather than the good compost you buy from the shops. Leaves and other brown material provide the best source of Carbon and should be added in at least as great a quantity as the other stuff. If you mix them together real well your compost will be, as they say, black gold.
Methods of Composting
My favourite method of composting mentioned in my book, and tested in my back yard is to have two alternating compost heaps. Over the course of my compost’s life it will have been turned a couple of times, and shifted into a completely separate bin once. This ensures good airing of the decomposing matter and will speed up the process and prevent rotting. The stuff at the bottom will decompose the fastest and airing will help the pile get hotter, so moving from one bin to another really helps the process along.
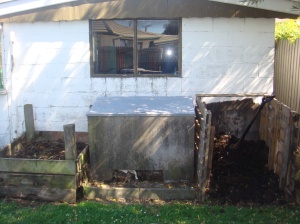
My compost bins on the left and right for oxygenating the compost. In the center is my larger worm farm.
Another method of composting is worm farms. I have two worm farms, one for our household which is right by the back door, and another much larger one for my work’s food scraps which I collect weekly. Worms take care of scraps faster than my compost heap and produce some very good by-products along the way. You can read my post on Worm Farming for more info on this approach.
One other method I use for composting is what I like to call “Chicken Rotation”. Simply by moving my chickens around the garden and throwing them food scraps I help to condition the soil for future planting. The soil is turned from dried out waste soil into nitrogen-rich soil with good structure where my vegetables will flourish next season. The chickens reinvest the goodness in their feed into the soil.
With Autumn on the way it’s a good time to start preparing for some leaf collection! I have three woolsacks ready for filling with some mulched leaves which I will add to my compost heap every time I add nitrogen rich matter over the winter through to summer months.
Good luck with your compost!


